|
|
10 months ago | |
|---|---|---|
| .. | ||
| .ci/attachconfig | 10 months ago | |
| applications | 10 months ago | |
| board | 10 months ago | |
| figures | 10 months ago | |
| .config | 10 months ago | |
| .gitignore | 10 months ago | |
| EventRecorderStub.scvd | 10 months ago | |
| Kconfig | 10 months ago | |
| README.md | 10 months ago | |
| SConscript | 10 months ago | |
| SConstruct | 10 months ago | |
| project.ewd | 10 months ago | |
| project.ewp | 10 months ago | |
| project.eww | 10 months ago | |
| project.uvopt | 10 months ago | |
| project.uvoptx | 10 months ago | |
| project.uvproj | 10 months ago | |
| project.uvprojx | 10 months ago | |
| rtconfig.h | 10 months ago | |
| rtconfig.py | 10 months ago | |
| template.ewp | 10 months ago | |
| template.eww | 10 months ago | |
| template.uvopt | 10 months ago | |
| template.uvoptx | 10 months ago | |
| template.uvproj | 10 months ago | |
| template.uvprojx | 10 months ago | |
README.md
STM32F401 BlackPill 开发板 BSP 说明
简介
本文档为 stm32f401-weact-blackpill 开发板的 BSP (板级支持包) 说明。
主要内容如下:
- 开发板资源介绍
- BSP 快速上手
- 进阶使用方法
通过阅读快速上手章节开发者可以快速地上手该 BSP,将 RT-Thread 运行在开发板上。在进阶使用指南章节,将会介绍更多高级功能,帮助开发者利用 RT-Thread 驱动更多板载资源。
开发板介绍
STM32F401 最小系统板子是 WeAct 推出的一款基于 ARM Cortex-M4 内核的开发板,最高主频为 85Mhz,该开发板芯片为 STM32F401CC。
开发板外观如下图所示:
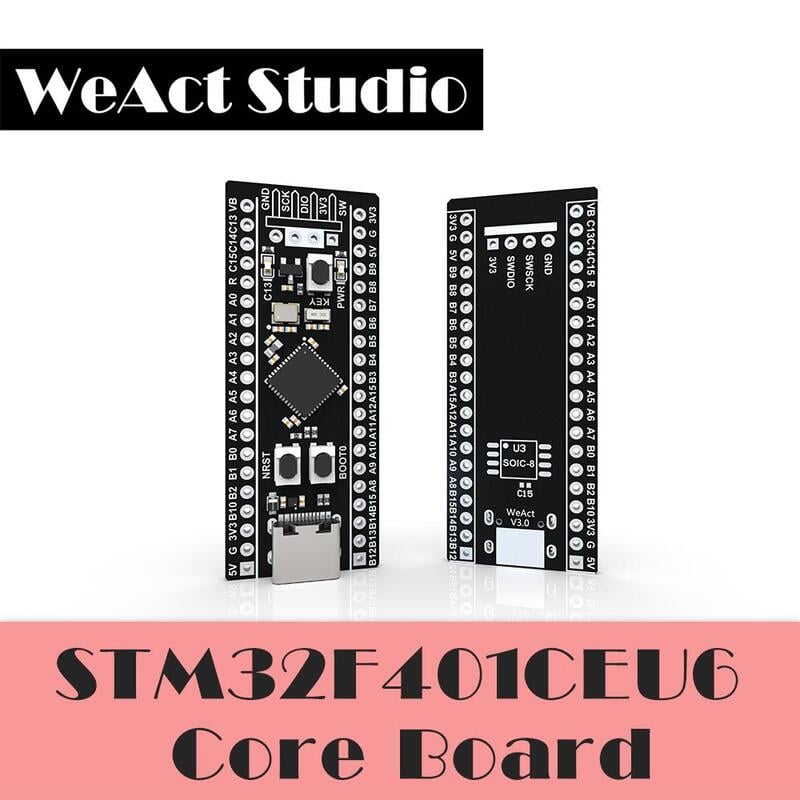
该开发板常用 板载资源 如下:
- MCU:STM32F401CCU6,主频 84MHz,256KB FLASH ,64KB RAM
- 常用外设
- LED:2个,DS0(蓝色,PC13),PWR(红色,power LED)
- 按键:3个,USER, BOOT0 and RESET
- 常用接口:USB 支持 3 种不同接口:虚拟 COM 端口、大容量存储和调试端口
- 调试接口,标准 SWD
开发板更多详细信息请参考STM32F4x1 MiniF4 WeAct。
外设支持
本 BSP 目前对外设的支持情况如下:
| 片上外设 | 支持情况 | 备注 |
|---|---|---|
| GPIO | 支持 | PA0, PA1... PH1 ---> PIN: 0, 1...47 |
| UART | 支持 | UART1 |
| SPI | 支持 | |
| I2C | 支持 | |
| RTC | 支持 | 支持外部晶振和内部低速时钟 |
| WDT | 支持 | |
| FLASH | 支持 | 已适配 FAL |
| USB Device | 暂不支持 |
使用说明
使用说明分为如下两个章节:
-
快速上手
本章节是为刚接触 RT-Thread 的新手准备的使用说明,遵循简单的步骤即可将 RT-Thread 操作系统运行在该开发板上,看到实验效果 。
-
进阶使用
本章节是为需要在 RT-Thread 操作系统上使用更多开发板资源的开发者准备的。通过使用 ENV 工具对 BSP 进行配置,可以开启更多板载资源,实现更多高级功能。
快速上手
本 BSP 为开发者提供 MDK4、MDK5 和 IAR 工程,并且支持 GCC 开发环境。下面以 MDK5 开发环境为例,介绍如何将系统运行起来。
硬件连接
使用数据线连接开发板到 PC,打开电源开关。
编译下载
双击 project.uvprojx 文件,打开 MDK5 工程,编译并下载程序到开发板。
工程默认配置使用 ST-LINK 仿真器下载程序,在通过 SWD 连接开发板的基础上,点击下载按钮即可下载程序到开发板
运行结果
下载程序成功之后,系统会自动运行,观察开发板上 LED 的运行效果,红色 LD2 常亮、蓝色 LD3 会周期性闪烁。。
连接开发板对应串口到 PC , 在终端工具里打开相应的串口(115200-8-1-N),复位设备后,可以看到 RT-Thread 的输出信息:
 \ | /
- RT -     Thread Operating System
 / | \     5.0.0 build Feb 24 2023 15:38:04
 2006 - 2022 Copyright by RT-Thread team
msh >
进阶使用
此 BSP 默认只开启了 GPIO 和 串口1 的功能,如果需使用 SD 卡、Flash 等更多高级功能,需要利用 ENV 工具对BSP 进行配置,步骤如下:
-
在 bsp 下打开 env 工具。
-
输入
menuconfig命令配置工程,配置好之后保存退出。 -
输入
pkgs --update命令更新软件包。 -
输入
scons --target=mdk4/mdk5/iar命令重新生成工程。
本章节更多详细的介绍请参考 STM32 系列 BSP 外设驱动使用教程。
注意事项
- 暂无
联系人信息
维护人: